
 Hi, I am Gregor Hohpe, co-author of the book Enterprise Integration Patterns. I work on and write about asynchronous messaging systems, distributed architectures, and all sorts of enterprise
computing and architecture topics.
Hi, I am Gregor Hohpe, co-author of the book Enterprise Integration Patterns. I work on and write about asynchronous messaging systems, distributed architectures, and all sorts of enterprise
computing and architecture topics.
Find my posts on IT strategy, enterprise architecture, and digital transformation at ArchitectElevator.com.
Part 2 of this blog series shows the implementation of the Loan Broker example using AWS Step Functions with a Recipient List. We built the interaction with the Credit Bureau in Part 1 already, so here we focus on the interaction with the banks. Using a Recipient List means that the Loan Broker retrieves a list of banks to request quotes from before making the requests one-by-one. Implemented in Step Functions it looks as follows:
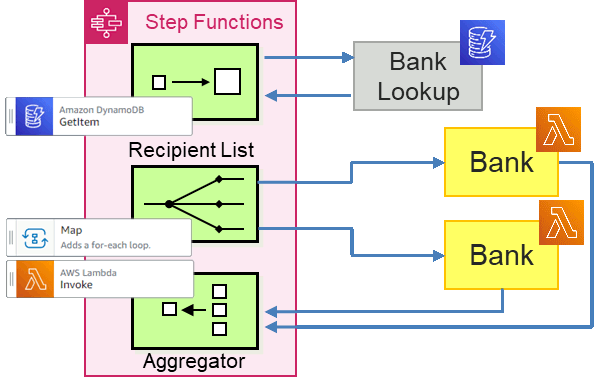
For this implementation, the enricher fetches the list of banks retrieves the data
from a DynamoDB item because it's very easy to do so via a Step Functions GetItem task. We'll then use a Map task to call the banks. Let's go ahead and build this. The code is available in the
public EIP repo under LoanBroker/AwsStepFunctions/RecipientList.
For our test implementation, we simply create a DynamoDB table and add the item from the AWS Console UI. Choosing the on-demand billing model and turning off all options (hopefully) assures that we don't incur any running cost due to provisioned capacity. Reading a single item from DynamoDB, a cloud database that delivers single-digit millisecond performance at any scale, might remind you of Marvin the depressed robot who routinely bemoans having to perform trivial tasks despite having a brain the size of a planet. So far, DynamoDB hasn't complained and any scale does go both directions...
As a NOSQL key-value store, DynamoDB doesn't require a fixed schema but it does require
a key, more precisely a unique primary partition key. You define this key's name and data type when you create the table the first time.
Yes, this one is a one-way door :-) Not being overly creative we define a key Type for our single row so we could envision defining different sets of banks for different
types of loans, such as home loans or car loans.
Once equipped with a key, we can create a single item and enter the ARN's of our banks'
lambda functions into an attribute list under that item. The AWS Console provides
a "tree" UI , which is useful for the very first element, after which it's easier
to copy-paste the JSON syntax, which takes some getting used to. If you already know
about "L" and "S", you can also proceed directly to the console:
$ aws dynamodb list-tables
{
    "TableNames": [
        "LoanBrokerBanks"
    ]
}

$ aws dynamodb put-item --table-name=LoanBrokerBanks \
   --item='{ "Type": { "S": "Home" }, "BankAddress": {"L": [ { "S": "BankRecipientPremium" }, { "S": "BankRecipientUniversal" }, { "S": "BankRecipientPawnshop" } ] } }'

$ aws dynamodb get-item --table-name=LoanBrokerBanks --key='{"Type": {"S": "Home"}}'
{
    "Item": {
        "Type": {
            "S": "Home"
        },
        "BankAddress": {
            "L": [
                { "S": "BankRecipientPremium" },
                { "S": "BankRecipientUniversal" },
                { "S": "BankRecipientPawnshop" }
            ]
        }
    }
}
Needing 3 tries to correctly type the key parameter was my just punishment for leaving the comfort of the Console UI. The CLI examples using a key file might give you a hint that your "{" key plays a major role in this
endeavor.
Now we need to make those Lambda ARNs real by deploying the banks.
What would a blog post be without a Matrix reference? Certainly not one of mine! So, if we want lots of banks, we better parametrize them. As our banks are just mock-ups, we do this simply via environment variables that we can specify on the command line. My love for simple solutions might shine through here—Borg also passed instance data via the command line and it scaled to houndreds of thousands of machines.
A simple bank that can be invoked from Step Functions can look like this in JavaScript:
function calcRate(amount, term, score, history) {
  if (amount <= process.env.MAX_LOAN_AMOUNT && score >= process.env.MIN_CREDIT_SCORE) {
    return parseFloat(process.env.BASE_RATE) + Math.random() * ((1000 - score) / 100.0);
  }
}

exports.handler = async (event) => {
    const amount = event.Amount;
    const term = event.Term;
    const score = event.Credit.Score;
    const history = event.Credit.History;

    const bankId = process.env.BANK_ID;

    console.log('Loan Request over %d at credit score %d', amount, score);
    const rate = calcRate(amount, term, score, history);
    if (rate) {
        const response = { "rate": rate, "bankId": bankId};
        console.log(response);
        return response;
    }
};
Each bank will vary its behavior by the following parameters:
MIN_CREDIT_SCORE - the customer's minimum credit score required to receive a quote from this bank.
MAX_LOAN_AMOUNT - the maximum amount the bank is willing to lend to a customer.
BASE_RATE - the minimum rate the bank might give. The actual rate increases for a lower credit
score and some randomness.
BANK_ID - as the loan broker processes multiple responses, knowing which bank supplied the
quote will be handy.
We can easily create and test this function from the Console UI. However, because
we want multiple instances, we better do so from the command line. Such deployments
require a ZIP file of the lambda function, which you can obtain by exporting the functions
via the "Actions" button in the console UI. You can then upload the file into your
cloud shell (alternatively just copy the function into a file and use the zip command from Cloud Shell). Equipped with the function's ZIP file, you can now instantiate
multiple bank instances by providing parameters on the command line (the repo contains
a simple script makeBanks that will do this for you after you edit the role to be used):
$ aws lambda create-function --function-name=BankRecipientPawnshop \
    --runtime=nodejs12.x --handler=RecipientBank.handler --role=arn:aws:iam::1234567890:role/service-role/CreditBureau-role-1gbub1sd \
    --environment="Variables={BANK_ID=PawnShop,BASE_RATE=5,MAX_LOAN_AMOUNT=500000,MIN_CREDIT_SCORE=400}" \
    --zip-file=fileb://RecipientBank.zip

$ aws lambda create-function --function-name=BankRecipientUniversal \
    --runtime=nodejs12.x --handler=RecipientBank.handler --role=arn:aws:iam::1234567890:role/service-role/CreditBureau-role-1gbub1sd \
    --environment="Variables={BANK_ID=Universal,BASE_RATE=4,MAX_LOAN_AMOUNT=700000,MIN_CREDIT_SCORE=500}" \
    --zip-file=fileb://RecipientBank.zip

$ aws lambda create-function --function-name=BankRecipientPremium \
    --runtime=nodejs12.x --handler=RecipientBank.handler --role=arn:aws:iam::1234567890:role/service-role/CreditBureau-role-1gbub1sd \
    --environment="Variables={BANK_ID=Premium,BASE_RATE=3,MAX_LOAN_AMOUNT=900000,MIN_CREDIT_SCORE=600}" \
    --zip-file=fileb://RecipientBank.zip
We cleverly use the same IAM role as the Credit Bureau Lambda function, which saves us from having to create a new IAM role. The magic number in the role ARN will be your account ID as with all other ARNs. You can get it from Cloud Shell with the following command:
$ aws sts get-caller-identity --query Account --output text
To show off our CLI prowess, we'll use the query parameter to show the created functions and their parameters (it took me indeed only
two tries to get this working):
$ aws lambda list-functions --query="Functions[].{Name:FunctionName, Parms:Environment}"

[
    {
        "Name": "BankRecipientUniversal",
        "Parms": {
            "Variables": {
                "MAX_LOAN_AMOUNT": "700000",
                "MIN_CREDIT_SCORE": "500",
                "BANK_ID": "Universal",
                "BASE_RATE": "4"
            }
        }
    },
    {
        "Name": "BankRecipientPawnshop",
        "Parms": {
            "Variables": {
                "MAX_LOAN_AMOUNT": "500000",
                "MIN_CREDIT_SCORE": "400",
                "BANK_ID": "PawnShop",
                "BASE_RATE": "5"
            }
        }
    },{
        "Name": "BankRecipientPremium",
        "Parms": {
            "Variables": {
                "MAX_LOAN_AMOUNT": "900000",
                "MIN_CREDIT_SCORE": "600",
                "BANK_ID": "Premium",
                "BASE_RATE": "3"
            }
        }
    },
]
These Banks are ready to dish out loan quotes (yes, the magic cli-binary-format argument is needed unless you want to convert your JSON payload into base64 yourself):
$ aws lambda invoke --function-name=BankRecipientPawnshop \
    --cli-binary-format raw-in-base64-out \
    --payload '{ "Credit": { "Score": 740, "History": 28 }, "Amount": 500000, "Term": 30, "SSN": "123-45-6789"}' \
    loanquote.json

$ cat loanquote.json
{"rate":7.442039050089985,"bankId":"PawnShop"}
We've avoided digging into AWS IAM so far as the console UI generated the required
roles for us (that's how we got to reuse the CreditBureau-role role). However, because we're planning to call Lambda functions dynamically, we'll
need to explicitly set some additional permissions. To make things easy, we give the
Step Function workflow (via its Role) permission to call all Lambda functions associated
with the account. We do so by defining a policy doc. It's a bit long for the command
line, so create a file invoke-lambdas with the following contents (the version has to be set to this specific date):
{
    "Version": "2012-10-17",
    "Statement": [
        {
            "Effect": "Allow",
            "Action": "lambda:InvokeFunction",
            "Resource": "arn:aws:lambda:*:1234567890:function:*"
        }
    ]
}
Look up the role that your State Machine is associated with in the Console and use that on the command line to the policy to that role:
$ aws iam put-role-policy \
    --role-name=StepFunctions-LoanBroker-role-1234567\
    --policy-name=CallAllLambdas \
    --policy-document file://invoke-lambdas
If we have any doubt, we can check that the policy is in place:
$  aws iam list-role-policies --role-name=StepFunctions-LoanBroker-role-1234567

{
    "PolicyNames": [
        "CallAllLambdas"
    ]
}
It looks much easier once you figured it out. It honestly took me a dozen attempts to get this one right (more on IAM further down).
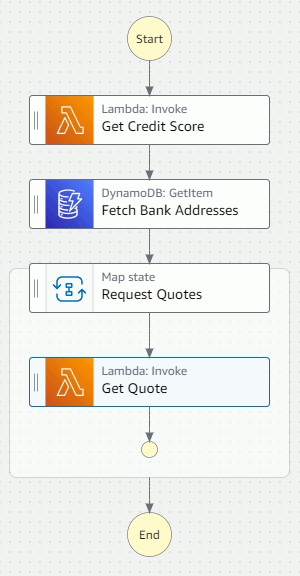 With both our data source and our lambda functions ready, we can build the state machine
flow. Using the Workflow Studio, setting up the control flow is quite straightforward:
With both our data source and our lambda functions ready, we can build the state machine
flow. Using the Workflow Studio, setting up the control flow is quite straightforward:
DynamoDB:GetItem task fetches the list of Lambda function ARN's.
Map state loops over the list of bank addresses.
Lambda:Invoke task calls the bank and concatenates the results
That part was simple enough. Managing the document state turned out to require a lot
more patience and many more tries. Fetching data from the DynamoDB table isn't too
difficult. We specify the same JSON fragment that we used for the command line as
the API Parameter (the command line arguments become part of the JSON here just as if you'd be making
an API call):
{
  "TableName": "LoanBrokerBanks",
  "Key": {
    "Type": {
      "S": "Home"
    }
  }
}
DynamoDB delivers back quite a bit of data but we want to extract only the Lambda
function addresses (ARN's) to make it easy to iterate over them. Our output from the
command line above helps us design the right expression to do this. Note that each
element in the result set is prefixed by a field name that denotes its type with "L"
indicating a list and "S" a string. This makes it a bit tricker to get the expression
right (I highly recommend an interactive JsonPath editor). The final expression iterates
over all items in the list (L[*]) and retrieves the "S" element, which contains the function address. This is what we enter into the ResultSelector (the magic .$ appendix indicates that this field is set based on a JsonPath expression).
{
  "BankAddress.$": "$.Item.BankAddress.L[*].S"
}
The result from this expression is a simple list of bank addresses, which we'll have
to merge into the current document. The ResultPath settings tells where (have a look at the data flow diagram in Part 1. We choose $.Banks, giving us the following document state at this point:
"SSN": "123-45-6789",
"Amount": 500000,
"Term": 30,
"Credit": {
  "Score": 890,
  "History": 28
},
"Banks": {
  "BankAddress": [
    "BankRecipientUniversal",
    "BankRecipientPawnshop",
    "BankRecipientPremium"
  ]
}
The Map task iterates over an array, which in our case will be $.Banks.BankAddress. Now we need to give the banks the data in the format they expect, which is a dictionary
of name-value pairs. We will also need the name of the Lambda function to invoke,
which we can retrieve via a magic incantation. This took a good bit of digging - what's
confusing here is that the Map.Item.Value is listed as an input for the map state but it's actually the input for the task
that Map iterates over . We end up with the following expression for the Transform array items setting:
{
  "function.$": "$$.Map.Item.Value",
  "SSN.$": "$.SSN",
  "Amount.$": "$.Amount",
  "Term.$": "$.Term",
  "Credit.$": "$.Credit"
}
We are mostly copying values to make them available to the Lambda invocation. In hindsight
I might have collated the data supplied by the customer in a single element to save
typing. $$.Map.Item.Value is the magic incantation for the current value in the array that the Map task iterates
over, i.e. the bank Lambda ARN in our case.
We can now use this data to set the payload for the Lambda invocation. We could have made things easier by selecting "use state input as payload", which would pass the lambda ARN along with the other fields. Because the banks likely know their address that wouldn't be too big a deal but I nevertheless decided to just filter our the relevant fields, resulting in the following payload definition:
{
  "SSN.$": "$.SSN",
  "Amount.$": "$.Amount",
  "Term.$": "$.Term",
  "Credit.$": "$.Credit"
}
Both the Lambda invocation and the Map task contain output processing, which we need
to configure carefully. Our banks return a rate and a bankId as we saw from the command line invocation above (or an empty string if it doesn't
provide a quote for the given parameters). The Lambda:Invoke task also returns a bunch of HTTP metadata, which interests us less. We'll merge
the actual bank result fields with the task input data via the following ResultSelector that'll store the results under the current document root node specified by $ (trying to reference individual elements results in a non-catchable States.Runtime error if the bank returns an empty string):
{
  "Quote.$": "$.Payload"
}
The output of one Lambda invocation now looks like this (specifying $ as the ResultPath replaces the existing document; that's OK because we still have the output from the
Map task):
{
  "Quote": {
    "rate": 6.571025629484854,
    "bankId": "Universal"
  }
}
Last, these individual results have to be aggregated. We'll simply let the Map task
merge the results. That setting is back under the Output processing of the Map task, which we set to $.Quotes. Our document state after the completion of the Map task is:
{
  "SSN": "123-45-6789",
  "Amount": 500000,
  "Term": 30,
  "Credit": { "Score": 890, "History": 28 },
  "Banks": {
    "BankAddress": [
      "BankRecipientUniversal",
      "BankRecipientPawnshop",
      "BankRecipientPremium"
    ]
  },
  "Quotes": [
    { "Quote": { "Rate": 4.718271541264695, "BankID": "Universal" } },
    { "Quote": { "Rate": 5.146337522656502, "BankID": "PawnShop" } },
    { "Quote": { "Rate": 3.9008046685055904, "BankID": "Premium" } }
  ]
}
If you want to clean up the document state to remove the bank addresses, the easiest way appears to insert a "Pass" task with an expression to transform its input into a cleaner result. Just as before it's best to test such expressions in a JsonPath tool or the Step Functions "Data Flow Simulator" (I'll explain the last expression below):
{
  "SSN.$": "$.SSN",
  "Amount.$": "$.Amount",
  "Term.$": "$.Term",
  "Credit.$": "$.Credit",
  "Quotes.$": "$.Quotes[?(@.Quote)].Quote"
}
It's time to run the Loan Broker state machine! We do so from the Cloud Shell (invocation is always asynchronous so we need to fetch the results separately):
$ aws stepfunctions start-execution\
    --name=mynicerun \
    --state-machine-arn=arn:aws:states:us-east-2:1234567890:stateMachine:LoanBroker-RecipientList\
    --input="{\"SSN\": \"123-45-6789\", \"Amount\": 500000, \"Term\": 30 }"
{
    "executionArn": "arn:aws:states:us-east-2:1234567890:execution:LoanBroker-RecipientList:mynicerun",
    "startDate": "2021-07-23T17:07:49.134000+00:00"
}

$ aws stepfunctions describe-execution \
    --execution-arn=arn:aws:states:us-east-2:1234567890:execution:LoanBroker-RecipientList:mynicerun \
    --query="output" | jq -r  '. | fromjson'

{
   "Credit": { "Score": 885, "History": 10 },
   "Amount": 500000,
   "Quotes": [
     { "Rate": 5.0826106695797915, "BankID": "Universal" },
     { "Rate": 5.4599342311437, "BankID": "PawnShop" },
     { "Rate": 3.00415534899031, "BankID": "Premium" }
   ],
  "Term": 30,
  "SSN": "123-45-6789"
  }
Taadaa! If you want to test a scenario where not all banks return a quote, you can run the state machine again with a higher loan amount that the PawnShow won't process:
$ aws stepfunctions start-execution\
    --name=mysecondrun \
    --state-machine-arn=arn:aws:states:us-east-2:1234567890:stateMachine:LoanBroker-RecipientList\
    --input="{\"SSN\": \"123-45-6789\", \"Amount\": 600000, \"Term\": 30 }"
{
    "executionArn": "arn:aws:states:us-east-2:1234567890:execution:LoanBroker-RecipientList:mysecondrun",
    "startDate": "2021-07-23T17:07:49.134000+00:00"
}

$ aws stepfunctions describe-execution \
    --execution-arn=arn:aws:states:us-east-2:1234567890:execution:LoanBroker-RecipientList:mysecondrun \
    --query="output" | jq -r  '. | fromjson'

{
   "Credit": { "Score": 693, "History": 24 },
   "Amount": 600000,
   "Quotes": [
    { "rate": 5.271301238502866, "bankId": "Universal" },
    { "rate": 3.8970175730277457, "bankId": "Premium" }
   ],
  "Term": 30,
  "SSN": "123-45-6789"
  }
Getting this output took a bit of extra tinkering because a bank not issuing a quote
results in "Payload": null for the task's output, which the Map task dutifully appends to the Quotes list as follows:
  "Quotes": [
    { "Quote": { "Rate": 4.718271541264695, "BankID": "Universal" } },
    { "Quote" : null },
    { "Quote": { "Rate": 3.9008046685055904, "BankID": "Premium" } }
  ]
To eliminate the empty response in the final output we use the following filter expression
in the final task: "Quotes.$": "$.Quotes[?(@.Quote)].Quote". The ?() operator evaluates the expression in parentheses, in our case the non-null existence
of a sub-node named Quote, and only returns array elements where the expression is true. This gives us the
cleaned-up list of quotes above.
Oddly, the same approach didn't work in the bank invocation's ResultSelector, perhaps
because the subscript operator with filter expression only works on JSON arrays and
not on objects (a quick check on jsonpath.herokuapp.com hinted that the Jayway evaluator accepts [?()] on objects whereas the Goessner implementation does not). The joys of "low code"...
:-)
Phew! Our state machine is working. We could surely add some bells and whistles like selecting the best quote from the list and returning it to the customer. You can invoke a Step Functions state machine from the API Gateway, although only asynchronously (via POST and GET results). Although I am naturally a fan of asynchronous interactions, I would have thought that for service orchestrations (which likely use express workflows) across synchronous APIs, a synchronous invocation would make a convenient choice. It'd allow you to make a orchestration look the same as any other lambda service, which would be neat. So, for the time being, our Loan Broker remains headless :-)
Looking at the final solution, it's actually quite simple: we ended up with two Lambda functions of a dozen lines each and a state machine with 5 states. The amazing part is that we didn't need any deployment or runtime infrastructure whatsoever, not even an IDE or a terminal shell!
Still, especially for me as a first-time user, building the solution took a fair amount of experimenting, fudging, and occasional face palming. I surely looks a lot easier in the demos. Here some of my initial thoughts:
The world of declarative low-code tools almost invariably relies on other languages to fill in the blanks. I can't throw too many rocks because I did exactly the same in my Messaging toolkit (back then we didn't have the "low code" slogan). So, to be productive with modern low-code tools, you need to be familiar with JSON, YAML, JsonPath, JMESPath queries, CLI syntax, HCL and a few others. The amount of code you'll write will indeed be much less but the complexity didn't necessarily decrease: Step Function workflows and IAM roles are highly complex constructs that you need to understand regardless.
Just because something is molded into JSON syntax doesn't mean the cognitive load goes away. OK, people might know where to put the curly brace and the comma (and innumerable double quotes), but that's about it. My little demo has JSON for state machine definitions and executions, document payload, filter and transformation expressions, Lambda function invocations, HTTP metadata, IAM policies, and I am sure I forgot a few.
Providing things as JSON alone doesn't achieve a meaningful abstraction. Actually, it often detaches the code from the execution environment by asking us to provide three magic settings that are wired together by a complex machine, which isn't visible from the settings at all. In this context I really like Nial Daly's conclusion (see his blog):
The best kind of code is the code you don’t have to write but that you actually understand. --Nial Daly
Good abstractions are those that are "even", meaning they allow you to reason about the system behavior despite hiding details. They don't have stuff from the underground popping up all of a sudden.
Building the Step Function control flow was quite simple, especially with the new
Workflow Studio. However, managing the document state, hidden behind input and output settings, took 80% of the effort. Perhaps I am too old for dynamic, no-schema, Json
everything, but the only way I could get it to work is by running the flow part-way,
capturing the current document state, building the expression in a JsonPath tool,
and pasting it into the configuration. Also, throwing a States.Runtime error for a missing field in a service response seems pretty harsh. The best option
I found was to always return a parent element, even if nothing is inside, and to just
reference that element.
I am well aware of the limitations of drag-and-drop transformation tools (spiderweb!), but I think the current tooling could provide better support than a text field. I'll have a chat with the product team—I know where they work :-)
If you meet a cloud developer who hasn't complained about IAM, Identity and Access Management, they likely haven't done any real work or they live in a world of stars, meaning they grant broad access to everything. IAM is a parallel universe to your system architecture—it defines dependencies between components by means of access control. AWS IAM defines accounts, users, roles, policies, principals, and a few more concepts, so you have to have at least a basic understanding to not run into frustrating "permission denied" error messages. The console helps by auto-defining policies. Alas, it can also leave you with scattered and poorly name roles.
When trying to allow the Step Functions state machine to invoke Lambda functions,
I first attempted to grant state machines the right to invoke the function via aws lambda add-permission. That seemed logical enough and worked for SNS subscriptions but not for Step Functions.
In the end I solved it by adding the ability to invoke Lambda functions to the role
used by the Step Function via aws iam put-role-policy. However, I got to this only after reverse-engineering via CloudTrails what function
the Console GUI invokes. I don't have a clear idea why I need to use one over the
other, or perhaps both are needed? I surely should invest more time but tbh, the diagram
on the How IAM Works page didn't exactly encourage me.
When you're tinkering to get things working, especially IAM setups, you are bound to end up in a state that you can't recreate. Perhaps one of your failed attempts didn't do what you intended but enabled a policy that was needed for a subsequent command to succeed. You'll never know until you rebuild an environment from scratch. So, as appealing as the Console UI is, make sure you capture your steps in an executable format. Doing it via CLI as I did is admittedly the poorest form but still eons better than clicking around in the UI (I simply had no brain cells left to also learn CloudFormation / Terraform / CDK).
So, my old rule is as relevant as ever:
Never perform any operational settings in a UI. UIs are meant for dashboards and visualizations, not for "clicking around until it works".
Cloud solutions are by definition distributed systems, which implies that how things are wired together is as important as what's inside the pieces. The catch is that the latter is much more easily seen than the former. So document your system structure and your assumptions independently from your solution code, either by hand or, better yet, programmatically with a tool like Structurizr. It wouldn't be too hard to auto-generate a Structurizr DSL like the following, which is sufficient to render a basic call graph (try it out at the Structurizr Demo Page; this might be a great topic for a follow-on post):
workspace {

  model {
    loanBroker = softwareSystem "Loan Broker Demo" {
      all = container "Components" {
        stateMachine = component "Step Functions"
        premiumBank = component BankRecipientPremium"
        universalBank = component "BankRecipientUniversal"
        pawnShop = component "BankRecipientPawnshop"

        stateMachine -> premiumBank "Get Quote"
        stateMachine -> universalBank "Get Quote"
        stateMachine -> pawnShop "Get Quote"
      }
    }
  }

  views {
    component all {
      include *
      autolayout
    }

    theme default
  }
}
Now that we have a good handle on Step Functions, let's crank it up a notch and implement the Scatter-Gather via a Publish-Subscribe Channel. I'll show how to in the next post.


 Gregor is a cloud architect and author. He is a frequent speaker on asynchronous messaging,
IT strategy, and cloud.
Gregor is a cloud architect and author. He is a frequent speaker on asynchronous messaging,
IT strategy, and cloud.